Thursday, January 28, 2021

Stash Buster Quilt Along

 Happy Thursday, this week actually feels like winter with the colder temperatures we have been having. I have been mulling over another Stash Busting Quilt Along, and hinted at it here a couple times. I have been eyeing up The Bonnie and Camille Quilt Bee since before it was even available to purchase, and my husband actually bought it for me for Christmas. I think that this will be a fun one to do as a Quilt Along! It is a great stash buster, and the pattern book also includes patterns for 12 other projects so it is a great bang for your buck. It has been a popular book in our shop so I am sure I am not the only one who would like to start making this fun sampler quilt that finishes at 68x80, and is pictured on the front cover of the pattern book. 


We will be following the Month Breakdown as in the pattern so it will be a 12 month qal and we will start sewing on February 8, which gives us a couple of weeks to get our fabric picks made. 

The Fabric Requirements for the quilt are listed in the pattern, but some blocks use pieces as small as 2.5" squares so it will be great to use up some of those small scraps you have been saving. 

I will be using Sherri&Chelsi fabrics, I think, as I have quite the collection of it. There may be a new collection or two at the shop that I have been eyeing so this may change yet ;)

 I will post my fabric pull to our Facebook Page (Chicken Feed Quilts) next week and I would love to see your fabric pulls as well so please post them in the comments section of my post. 

For the Quilt Along you will need the Bonnie and Camille Quilt Bee book, we have one left in stock right now, plus several more on the way. We also have two kits left using Shine On by Bonnie and Camille, which is the same as the fabric used in the pattern, if you don't have a huge stash or would like to use a kit. 

Each month on the second Monday (starting February 8) I will post the blocks we are making, a photo of my own and any tips or useful products to help in making the blocks. 

One tip before we even start, I took my book to Minute Man Printing in Lethbridge and for a small fee they were able to put a coil binding on my book. This way it lays flat open to the correct page, and I don't wreck the spine of the book. I have done it to a couple books, and plan on bringing a couple more of my favorites in for the same treatment. 

I would love for you to sew along with me and to share your progress as we go too. There will be 2 prize packs available to win for those that sew along, one in month 6 and the other in month 12, I haven't made the prize packs yet, but will put them together and post them on February 8 as well. 

You do not need to officially sign up anywhere, just sew along for some relaxing fun!

If you have any questions please let me know, 

Kayla

Monday, January 25, 2021

Virtual Retreat Recap

 We had our first ever Virtual Retreat this past weekend, and aside from a few minor technical difficulties it went really well. The feedback has been great, and it was wonderful to spend a few days quilting with others! 

We had 24 ladies from Saskatchewan, Alberta, and BC join us for the Retreat, which ran Thursday, evening, Friday and Saturday. 

Prior to the event all the attendees filled out a Questionnaire, and based on their answers we created custom kits for each. In addition to the fabric each Retreat package contained, the pattern, a goody bag of gifts, and an envelope saying do not open (for a game we played Friday Evening). Each package was sealed up, and shipped out or made ready for pickup at our shop. All the attendees were instructed to keep their bag sealed shut until the event if they could, and we had them open the packages on camera Thursday Evening. 


Thursday Evening we showed off our Quilts that we had made prior to the event as samples, did a shop tour, and had everyone show off their sewing spaces and get to know each other. It was so neat to see everyone's sewing rooms!


Many of us started sewing on Thursday Evening, but the real sewing started on Friday after a couple tutorials. 


We were all making quilts from the book called Stripology Mixology by GE Designs. The books contains 13 patterns perfect for Precuts, all of which are fairly simple in their construction but look very impressive. Although the book was written to use the Stripology Rulers by GE Designs, instructions are included for regular rulers. 

We did lots of Show and Tell with our progress throughout the weekend, everyone made good progress, and several people were able to completely finish their quilt tops. 


We would love to another Virtual Retreat in the future so watch for more information on when that will happen. 


Thank you again to everyone that joined us, we had sew much fun!

Kayla

Monday, January 18, 2021

Heart Quilts

 Valentines is just under a month away and I for one love making Heart Quilts! Esther, Carrie and I have all made several so tonight we wanted to share our favorites with you and hopefully inspire you to make a new one too. (And yes this means I did not get the details figured out for our next stash busting quilt along, but I will work on it)

Anyways back to Heart Quilts. Esther made this really fun one a few years back already using a wide variety of Art Gallery Prints and we sold so many kits of it. We actually made a couple more kits using similar fabrics if you want to make one too. 

This little cutie that Esther made is from the book Follow Your Heart and it is just adorable, and the perfect size for a baby quilt or a wall hanging. 


Carrie has a couple she's made too. 

The first one is this one from the Jelly Filled Book by Vanessa of Lella Boutique, Carrie used Love Story Fabric by Maureen Cracknell. We have kits available in the shop for this one. 

She also made this Piece and Love Quilt using an Art Gallery Collection called Foresta Fusion

I have several and in addition I picked 3 more to make when I was working on Friday.

One of my favorites is my Hearts at Home Quilt I made during a Quilt Along on Instagram last year. I made it large enough to fit my bed and it is on it right now. 

I love this runner called Jelly Roll Hearts (free pattern on Moda Bakeshop which can be found here) It uses 2.5" strips and is great for scraps. 


I also had a lot of fun making this Pixel Heart Quilt. We still have a couple of kits left for this one I think, so ask about it in our shop. I think maybe I want to make another one using smaller squares. 

I chose two Infinite Hearts Quilts on Friday. There is a quilt along that starts today for it and I can't wait to get sewing on them tonight. 

For one I am using fabrics from my Sherri and Chelsi stash, and the other will be a sample for the shop featuring a couple Ombre Bloom colors, there will kits available for the Ombre one as soon as the pattern arrives in the shop. 

The other new one I am starting is one called Quilty Hearts, kits are available for this one now and we used the fabric Just Red by Zen Chic. 

Esther and Carrie have also each picked a new Heart Quilt, but I don't have any photos so you will have to follow our Social Media or watch for a new "What Are We Working On" post to see those. 

Have you made any Heart Quilts, or are you planning too? 
I read on a blog of a family that had a Love Quilt and for the first little while in February the quilt was passed to a new person each day along with a little note which had something that they loved about that person. I think this is a really fun idea and may have to implement it in our family. 

We will be sharing a lot of these quilts and more of our favorites on Facebook Live tomorrow so be sure to check them out. 

Have a great week, we have the Virtual Retreat this weekend so there will be no blog post on Thursday as we will all be busy getting ready, but I will share how it went in next Monday's post. 
Kayla


Thursday, January 14, 2021

Tips to Organize and Use your Scraps/Stash

 Hello again friends. Earlier this week I went over some tips on how to help you get your unfinished projects organized and sorted and a few ways to help get some finished. Today I want to talk about your stash. 

There are a couple ways to organize your stash and your scraps. 

First is by size, you can fold all the larger pieces neatly and stack them nicely in a cupboard or on a shelf. The small pieces I would suggest cutting into sizes you would normally use, a really good way is into 5" Squares, 3" squares, and 2.5" strips. Or whatever size you really like to use, but these sizes mentioned are good ones to work off of, and than storing them in little totes that are labelled with the size. 

Another way is by color, again fold the larger pieces but then stack them up in colors, and rather than cutting up all the small pieces just put them in a tote or basket with other colors in the same family, reds, pinks, yellows, greens, aqua, navy etc.

You could sort through your scraps every time you finish a project or have a little basket that you sort through when ever it is filled. 

There may be fabrics that you really don't love anymore and it is totally fine to sell or donate these. 

My quilt room is nonexistent right now, all my organized totes are in closets around the house wherever they fit (my four boys have quilting supplies in their bedroom closets at the moment)  and I am sewing at the kitchen table until our renovations are finished, so I have no photos to share of how I organize my space, but when my new sewing room is finished I will share photos of it here. 

My favorite way to use up scraps and my stash is to join a quilt along and try not buy any fabrics for it. A quilt along is a great way because usually other people are joining in as well and it helps keep you accountable to working on and finishing the project. 

I did the Gypsy Wife Quilt along here a couple years ago and several people me included made their quilt completely from their stash and they looked so fun! (I'll admit mine was a very planned "scrappy" quilt, and although I used 10 collections of fabric they are from the same designer.)


Another way to use them up is to shop from your own cupboard first when you pick a new project. You can add new pieces in if needed. 

Or make some quilts and donate them to a charity or someone in need. 

A couple other great stash buster patterns are Log Cabin Quilts, Pineapple Quilts, String Quilts and simple square patchwork quilts. Creative Grids has rules in various sizes for the Log Cabin Quilts and Pineapple Quilts so you can get really nice accurate blocks. 

I have plans for another scrap buster quilt along so stay tuned for the details on that. If I can get the details sorted this weekend I will post about it Monday. 

I don't have a very large stash and that is for a couple reasons, I have the quilt shop at hand and I don't enjoy making scrappy quilts, I like to use one collection or one designer (I can mix Art Gallery collections and designers, but I cannot add in any other manufacturer to that). I also try to do a scrap buster quilt every year to stay in control. 


I have seen a lot of beautiful scrappy quilts, I just would rather work with a full collection by a fabric designer. 

If you also don't really enjoy making scrappy quilts and would rather work with a full collection from a designer, don't feel bad donating your fabrics to a guild or charity organization or selling it on a buy and sell group. Just like other items in your home it is ok to get rid of things including fabrics that don't work for you or don't make you happy. 

Have a great weekend, we have some yard work to do after the big wind storm yesterday, hopefully the warm weather will stick around for that. 

Kayla


Monday, January 11, 2021

Goals for the New Year: Part 1

 We are a couple weeks into 2021 already, and this week I want to talk about setting goals and making them happen. 

A lot of people tend to make new goals and resolutions at the start of a new year. When in the quilt shop the two I hear most are I need to finish what I have and I need to use up my stash before buying anything new. There is nothing wrong with those thoughts and goals, however how we approach that may be unrealistic. 

Sometimes the undertaking is just to big to actually accomplish without being discouraged. 

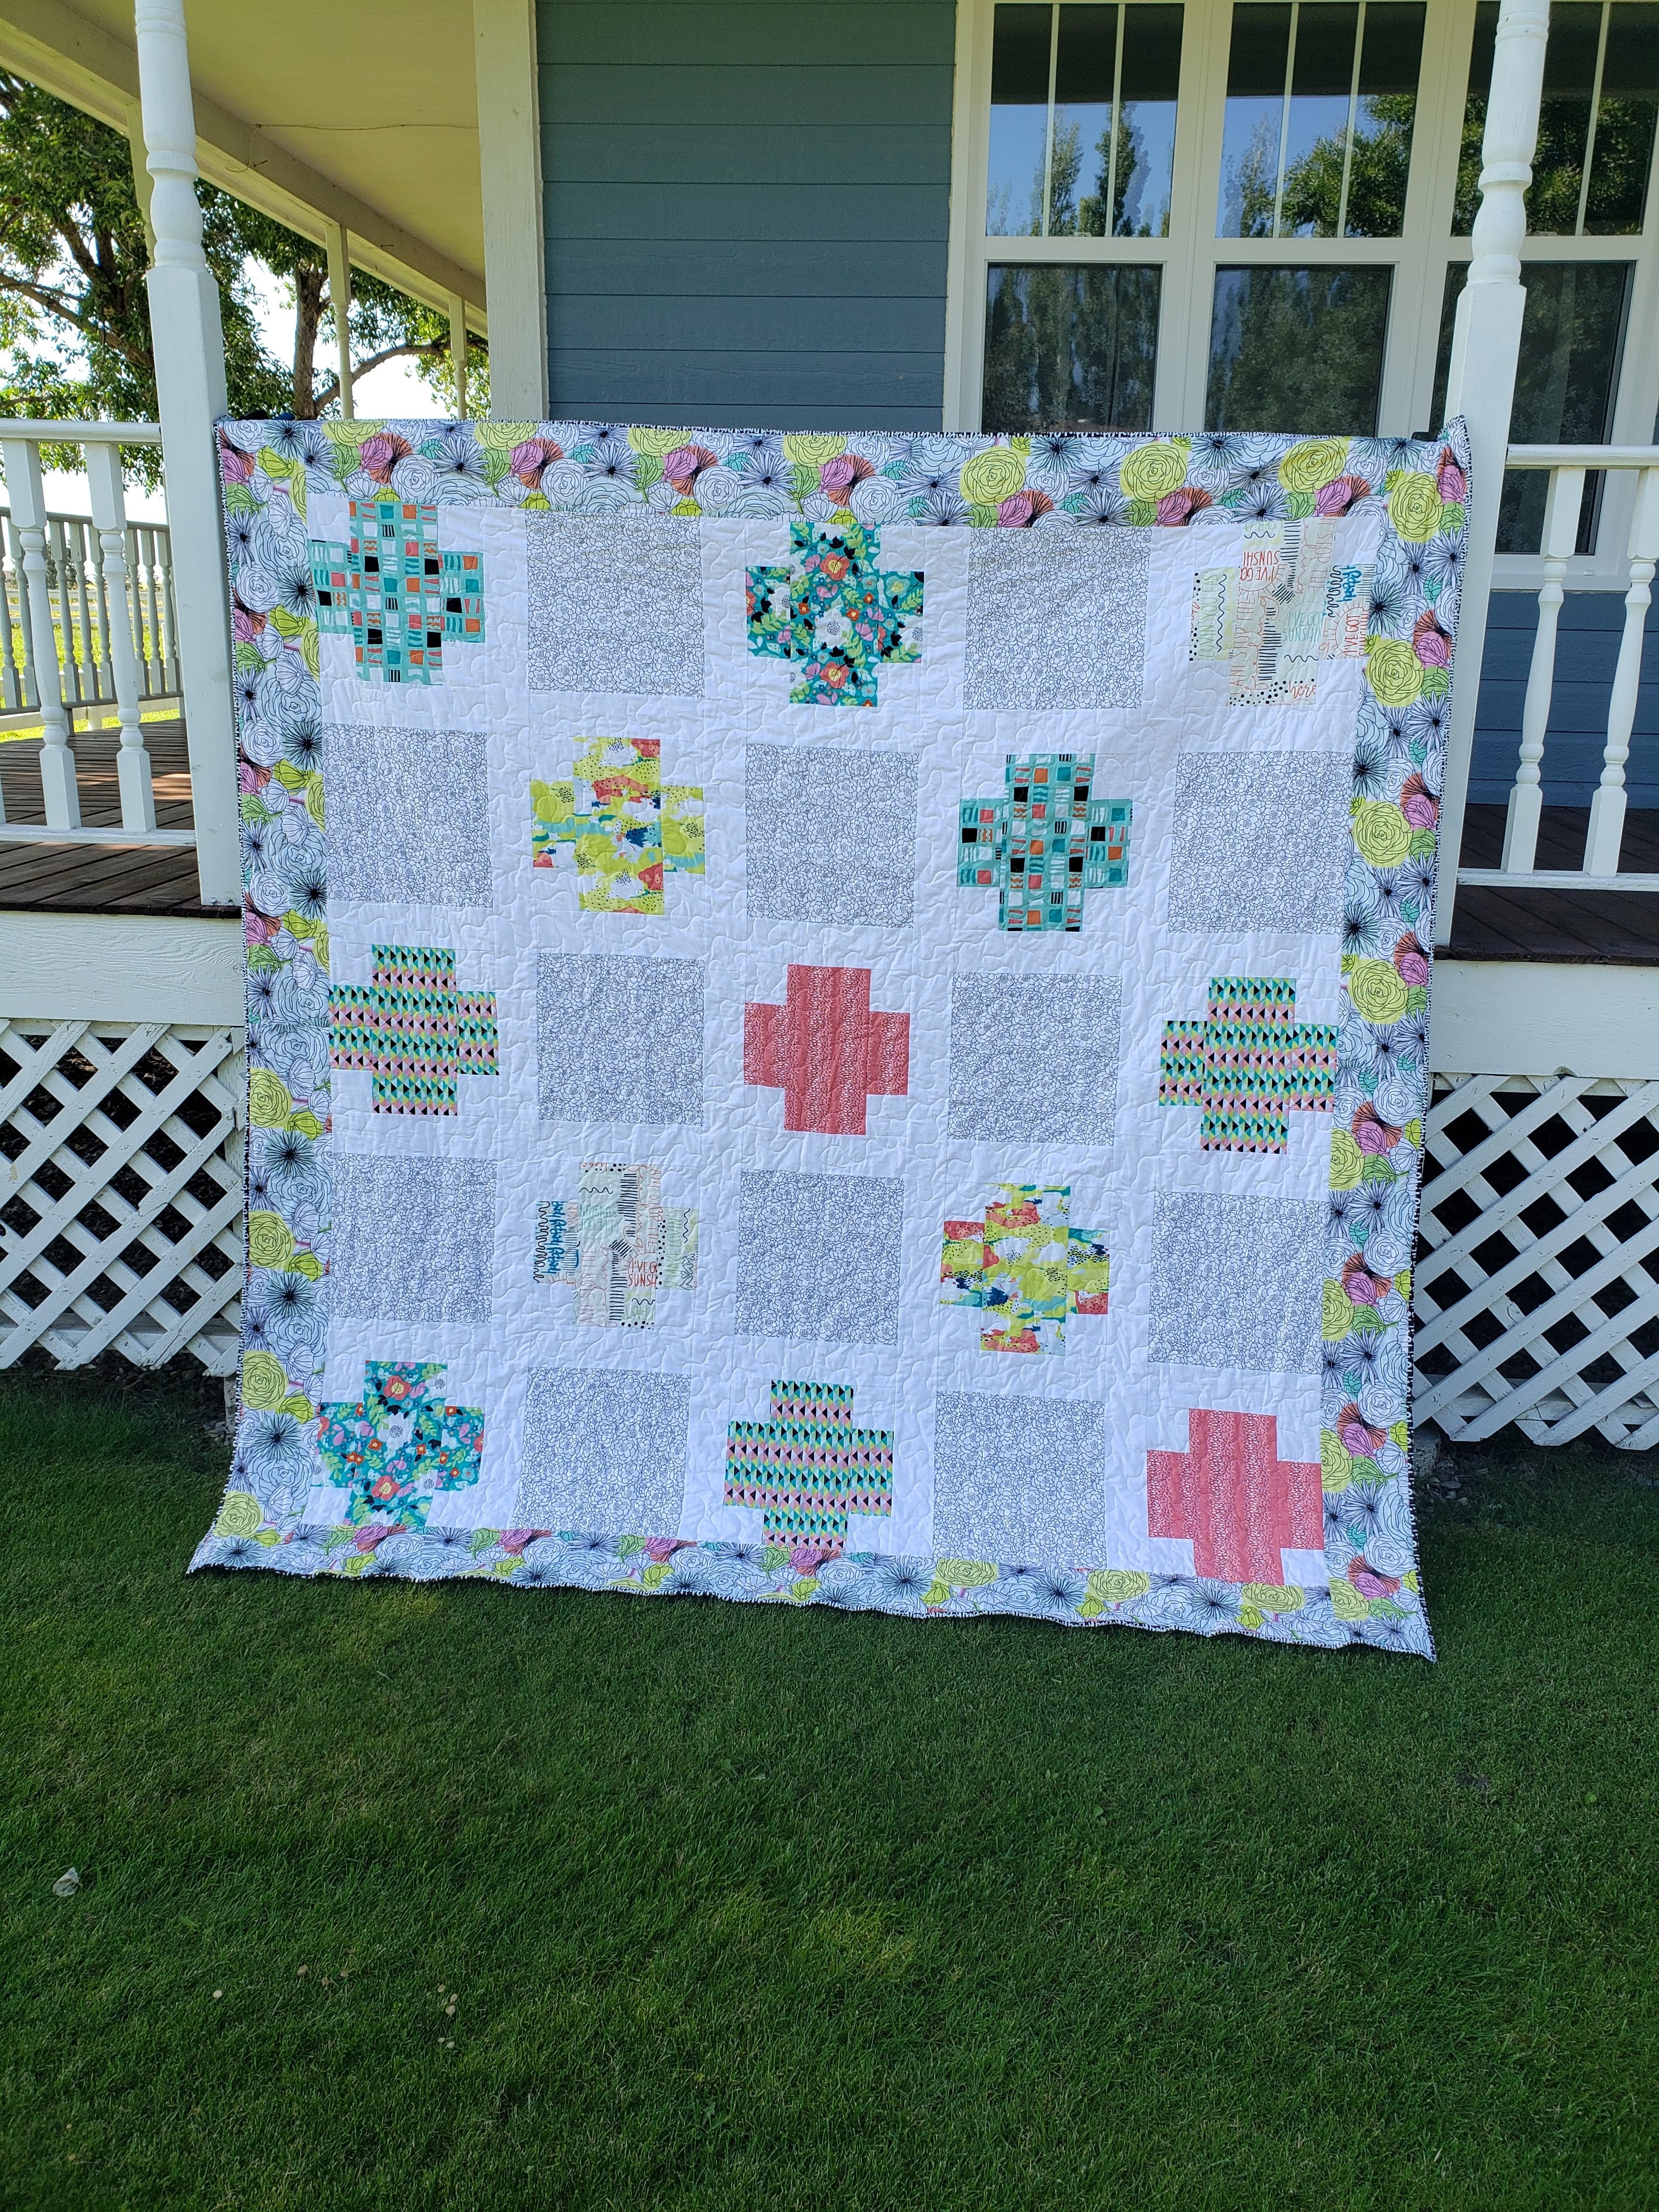
This quilt was a work in progress for quite awhile, it was actually supposed to be larger but I just wanted it off my mind so I decided this was big enough and finished it off. 

I have a couple tips about how to finish old projects and how to organize and work your stash so that your goals can actually be reached. Tonight I will talk about old projects and Thursday I will go into the stash. 

First go through the projects you have on the go and have abandoned. Make two piles, ones you actually want to finish a


nd others that just don't interest you anymore, maybe your tastes have changed, or the person you intended to make it for has changed (or grown from a baby to an adult). If you have lots on the go you can do this over several time periods, rather than all at once which can be discouraging. 

Now that you have two piles go through the ones you want to finish and prioritize them into an order of needs to be finished quick down to ones that you love but don't have an actual deadline. Maybe one needs to be done soon for a gift or it is seasonal and should be finished by the time that season rolls around. There could be some that could be finished quickly and others that are going to be a little more time consuming, you could make a couple different organized piles if need be. Now put them in your cupboard with the most important ones on top. I love using clear totes to store my projects so I can see what is in each one at a quick glance. 

When they are organized you need to make some more goals. How many do you want to be working on at once, do you work better with rewards or deadlines? That sort of thing. 

For myself I like to have a few different projects on the go at one time, in various stages. I like a difficult one to keep my brain stimulated, an easy one that if I have just  a little bit of time I can go work on it, and some that need hand binding as well. That is all that I will have out, the rest will be put away in totes, out of sight out of mind. 


This quilt was on my "to be bound" pile for a couple years, this past summer I moved it to the top of the pile and told myself it had to be finished by the end of the week. It got done!

I also like to set deadlines and rewards. I will tell myself a certain quilt has to be finished by the end of the month, and it usually ends up finished, sometimes it doesn't but that is OK, as long as I have made some progress. Another trick is to tell myself that if I finish these 3 projects I can pick a new one, or I can get that new fat 1/4 bundle I have been eyeing. I never try to make it a goal that is not achievable, quilting should be a relaxing hobby not one that causes more stress. 

I know Carrie chose 12 projects from her unfinished pile and labelled them each with a month of this year. When said month rolls around she will pull it out and work on it. She did this last year too and she said it really helped her feel like she was making a dent in older projects but still having time to work on new projects. 

A tip I got from another quilter was set aside one day or week of the month for old unfinished projects and just work on them at that time.

We started a PhD (Projects Half Done) accountability project during Facebook Live last week. We set the first Tuesday of the month as PhD Day, Esther made some goals for herself to have finished by the end of the month and encouraged everyone else to send in a photo of their project as well as a goal. Everyone that does will get entered into a draw for a gift, this month a Gift Card to our shop. It is a good way to have some accountability. There are others that know of your goal, and can check back with you to see if you accomplished it or not. (By the way it's not too late to join in on this, just send us a photo of your project and what you would like to have done by the end of the month, maybe all the blocks finished, or the top completed, or maybe just 5 more blocks done, whatever is an achievable goal for you)

Think about your self and your schedule and what would work best for you. Whatever you decide, make it a goal that is something that you can actually accomplish. 

Now that you have a plan for those projects you want to finish there is the other stack to sort out. 

There are a number of things you can do. You could just throw it out (don't get mad at me for saying that, if you truly no longer like it and have no love for the fabrics than that is one way to get rid of it)

Another option is to donate it or sell it on a marketplace or buy and sell group or yard sale. Just because you don't like it, someone else might, and they may be able to make good use of it, better use than sitting on your shelf and weighing on your mind. 

If you still like the fabrics but not where the project was going you could divide the fabrics up into scrap bins, you might use the fabrics up quicker that way, and then they are not just sitting there waiting to be made into that project you no longer have any desire to do. 

 If you have a number of blocks finished and feel like you have too much invested into it to get rid of it  you could just make it into a baby quilt, wall hanging or table runner. That way you didn't "waste" time making those blocks, and you get a project finished. 

There is absolutely nothing wrong with donating, selling or getting rid of old projects, if you don't like it the project will just take up space in your sewing space and in your brain, with very little chance of it every getting finished. 

Remember quilting is supposed to be a fun way to relax, it really is a type of therapy! 

I hope some of these tips help you to get your unfinished projects sorted out, along with a plan to get some finished. Thursday I will be back with some ways to organize your stash. 

Kayla

Thursday, January 7, 2021

Garden Sampler: Month One - Mint Block

 It seems crazy that we are already a week into January of 2021! With the beginning of a new year comes the start of new block of the month projects, and I am excited to make the Garden Sampler Quilt with you all. 

Since we are going to be working on this block of the month for quite some time, i reduced my stitch length to a 2.0 instead of a 2.5 to help my blocks keep their size better as this quilt is supposed to take us all year. 

As we begin this block of the month, I am cutting off a little piece of the selvage that coordinates to the fabric it is supposed to replace and gluing this sample into my book as pictured below. 

Let's begin block 1. I cut all my pieces and labeled with Alphabitties just to help me keep all my pieces straight, as some are very similar in size. 

I noticed that they ask us to cut all the pieces for the center 25 patch individually. For this I cut a strip of background, and my blues, and strip pieced these components rather than piecing all these little squares individually. 


For the stitch and flip corners I used my Creative Grids Folded Corner Clipper instead of drawing the line, then sewing on the line and trimming. Using this tool eliminates the step where you draw the line. With this tool you cut 1/4" from where you'd like to sew, then use this as your seam guide. 


My Components

This block is pieced in a 9 patch fashion.
 
My Mint Block


Monday, January 4, 2021

Woodland Wonderland: Month 7

 Happy New Year Friends! I hope you all had an enjoyable Christmas and New Years break. Ours was busy even though we couldn't get together with anyone because of the current limitations here in Alberta. We had a Christmas Dinner with just our family, ate a lot of big brunches, had lots of movie nights, watched a lot of hockey, played a lot of board games, did some more work on our basement, and stayed up until midnight on New Years Eve (all four boys! lets just say New Years Day was quite lazy)

Now it is time to get back into a regular routine which I am looking forward too.

I did get some sewing done over the break, and one of the projects I finished was my Woodland Wonderland Quilt. There was just one chapter left, and so I will share the details with you now. 

Chapter 7 starts on page 34 of our booklet. There is a lot of work for this month, we need to make a couple more blocks for the quilt top, as well as some filler blocks and than we get to finally assemble the quilt top! But if you just work through step by step it is a lot less overwhelming!

First up the blocks. We need to make 2 skinny tree blocks and 1 Starburst Block. They are straightforward to make and the trees especially come together quickly. The starburst block is a little more work, but it is a bunch of small units that you make and put together and all of a sudden you are out of pieces and your block is finished. 

This completes all the main blocks for the quilt! 

Next up is the assembly of the quilt top, and the making of filler blocks. This is the overwhelming part if you look at all of it together, and I actually put it away twice thinking I did not have the mental capacity to work on it. But I finally told myself I had to have this quilt completely finished for January 4th so I better get to work, than I opened it up and just started. 
To be honest I did not cut all my background up at once, I just did it as I went along, this was for a variety of reasons, one of them was I felt like sewing at the time not cutting, but the other reasons are listed where applicable below. 
It would probably be faster to do it all once, but if you do just be sure to label each piece as some of them are very similar in size. 

The top right section gets made first. Don't worry about any of the others just focus on one at a time. You have to make the flying geese filler blocks as stated on page 38 and than use your previously made blocks, and some filler strips to get your section made. There are no steps to follow for the order of assembling this or any of the sections, you just have to look at the diagram. Start with the smallest pieces and build it. This one start with the star, add your flying geese, and add filler 4 above it. Than sew your 3 twinkle stars together with the filler piece 7 and add to the bottom of the first section, add filler 10 to the bottom of that, than sew on your Owl, and finally add your starburst block.

Once the top right is done you make the top left. 

This one has some checkerboard filler rows to make. The pattern has you cut the checkerboard pieces into small squares and than assemble them into rows. Instead I strip pieced mine. So I cut the strips of fabric to 1.5" wide and than sewed them together along the long edge. I pressed towards the background fabric. Than I cut the pieced strip in half and joined the two sections together again on the long side, repeating until I had the correct number of squares, than trimmed it to be the correct width. I did this for the small rows and the big long one, (the big long one I used 1 red strip, 1 green strip, and 2 background strips, sewing the red to a background, and the green to a background, and than sewing those two sets together before doing any cutting) I forgot to take pictures of this so I hope it makes sense without. I would not have been able to this if I had cut all the z background squares as directed in the background cutting directions. 

One the checkerboards are made, assemble the rest of the section. Again there is only an image to follow so just start with the smaller pieces, making rows and sections that can be combined. 

The Churn Dash filler row I put off for awhile but it actually came together really quick when I put my mind to it. A couple notes for this row. I did not cut my a or x squares on the diagonal before sewing. Instead I marked with a pen and sewed on either side of the line and than cut them apart. That is just personal preference but I thought I would share it with you. It also has you use some slightly bigger seams or trim blocks to make it fit. I chose to take 6 of the 8 zdz units and trim them down an 1/8th and than sewed all the units together. My row fit into my quilt really well. 

The gnome and mushroom section goes together really quickly and easily!

The flower and stem sections we mostly assembled already earlier back in Chapter 5, we just need to make the stems a little longer. Be sure to keep your pieces organized for this section, it is really stressed in the pattern too. 

Now we get to put all our sections together. Here I measured my sections before cutting my filler 7 strips so that they fit together nicely, mine were actually a smidge longer than they should have been, so I was glad I hadn't cut the filler strips at the start. 

I chose not to make the flying geese border, and instead added a small border of background fabric on all four sides of my quilt. I used up small pieces of background fabric wherever possible when making my quilt so I had enough yardage leftover to do this. If you like this idea, just be sure to see what you have left and than divide that into 6 or 7 before cutting so that you don't run out after cutting the first 5 strips. For reference mine were cut 2.5". 

I quilted my quilt with an orange peel pattern and used the solid red binding to finish it off, the backing is white Fireside. 


I loved making this quilt and hope you did too! 

Carrie will be back on Thursday with the first blocks in her new quilt along. 

Have a great week, 

Kayla