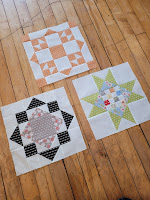
Hello again! I am posting Month 11 for our Bonnie and Camille Quilt Bee just a little early, but I thought if I posted it today than I could post the finishing next week. Because if you are anything like me, once you get those final blocks finished you are not going to want to put it away again, but rather jump right into assembling your blocks into a finished quilt top!
This month we have 3 blocks to make, each one of them different. We have the Starburst Block on page 124, the Summer Block on page 126 and the Sunshine Block on page 128.
Starburst Block. For this block I chose to use a color that I felt I had not used very much of yet. Maybe you want to take a look at all your blocks and see if there is a color that is a little under represented. The block itself goes together really nicely. When making the center of the block I pressed the blocks in each row to A and when assembling the rows pressed both the top and bottom to the center, this helped with nesting seams and getting a nice flat center. When making the CG units I pressed my Left Units towards the G and my Right Units toward the C, this allowed me to nest the seams when assembling them and I got nice points there.

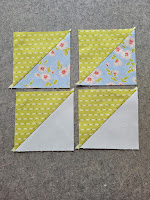
Summer Block. For this block I had a mistake in my pattern book in the cutting instructions. For B in the background it says to cut a 2 1/2" strip and subcut into 4 - 4 1/2" squares. You need to cut your strip 4 1/2" in order to get the squares, 2 1/2" just won't work. To make the 4 hourglass units I did not cut my A, D and E squares into triangles instead I made half square triangles and than used those to make the quarter square triangles.
To do this: (A is white, D is green and E is blue in my photos)
Draw a line on the diagonal of the wrong side of a D square, place right sides together with a A square and sew a 1/4" from each side of the line, cut apart on the drawn line and press towards D. This will result in 2 AD HST units.
Repeat with the remaining D and 1 E squares for 2 ED HSTs.
Draw a diagonal line on the wrong side of a AD HST going across your stitch line.
Place right sides together with a ED HST making sure your D pieces are not on top of each other and your seams are nested tight together. Sew a 1/4" from each side of the line. Cut apart on drawn line and press open.
Repeat with the 2nd units to make a total of 4 ADED quarter square triangle units, also known as hourglass units. Trim to the correct size using your favorite method. I used my 4-in-1 Creative Grids Half Square Triangle Ruler.
This is how I almost always make mine, and it avoids working with the bias edges too much.
The rest of the block I assembled as the pattern instructed.
Sunshine Block. For this block I used my Ultimate Flying Geese Ruler from Creative Grids and the heart method to make 4 at a time flying geese. The cutting for this is a little different as you cut one large square and 4 small squares to make 4 Flying Geese, but I love the extra trimming room it provides. The sizes to cut are written on the ruler and how to trim are included in the pamphlet provided with the ruler. Once I had my Geese made I pressed completely opposite of the pattern, because I dislike pressing geese towards the top point but would much rather press towards the flat bottom of the geese.
Aside from all my changes it was a fun block to make.
I will be back next week to share some assembly tips!
Have fun making your blocks and have a great week.
Kayla


No comments:
Post a Comment