Monday, December 13, 2021

The Bonnie and Camille Quilt Bee: Month 12

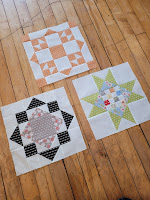
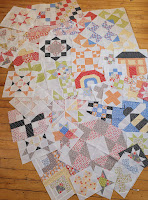
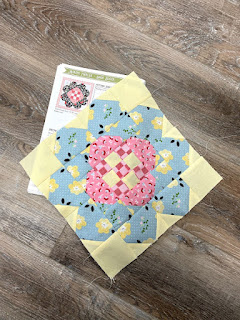
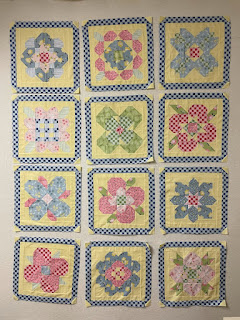
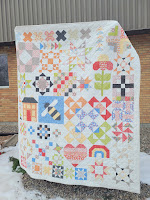
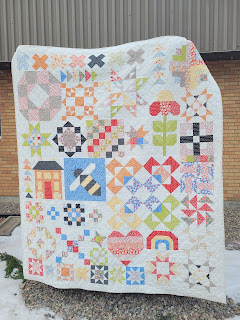
 Hello again, today I want to share some tips with you on finishing up your Bonnie and Camille Quilt Bee Quilt! I had so much fun making the extra filler blocks and putting it all together and I am in love with how my quilt turned out!


The finishing instructions begin on page 130. We need to make a couple filler blocks and than assemble our top in sections. 

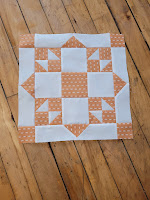
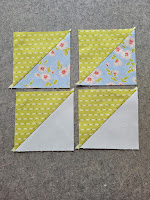
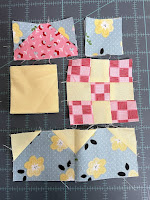
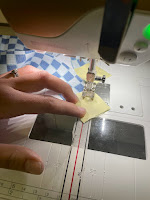
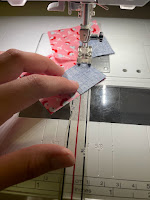
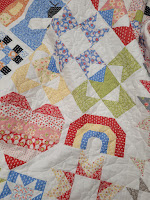
The flying geese on page 130 I made as directed. Normally I use my Flying Geese Ruler from Creative Grids, but this time I just followed the pattern. You are going to use first 6 on page 130 and the next 7 will be used on page 132. 

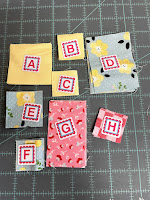
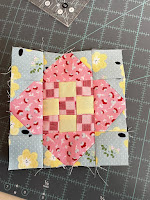
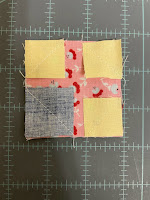
When putting your Criss-Cross blocks together, you can widen or narrow your B filler piece to get it to right length if needed. And this goes for all the filler pieces in the quilt. If you need any of them to be bigger or smaller to get the sections to fit together properly just make them the size needed. 

On the bottom of page 131 you are instructed to make 6 more Geese. For this one I did use my Ultimate Flying Geese ruler and made 4 at a time, and just ended up with 2 extra geese. I prefer to make my Geese this way as I can trim them to the correct size. 

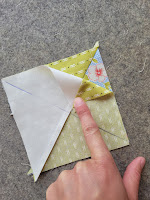
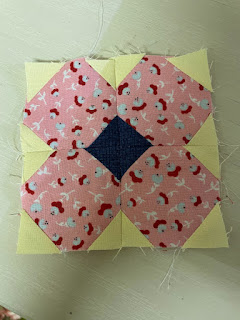
For the rest of the quilt the assembly is quite straight forward, especially if you work best off of pictures. If you work off of worded directions it may not be so easy, as there are not a of written instructions. There are pressing instructions displayed on each image, but I just pressed in the direction that my fabric seemed to want to go. 


When I assembled my quilt top I laid the whole thing out on the floor before sewing any blocks together. This was to see if I would like the color distribution through my quilt. I did end up swapping a couple blocks around to get a layout I was happy with. Don't be afraid to do this to your own. It is your quilt and nobody will know if you swapped locations of blocks. Make sure any blocks you do trade are the same size, otherwise it will get tricky for you. 

In my quilt I swapped the house and the bee, they are the same tall and in the same row so it worked well, if I hadn't I would have had a lot of orange and red in the lower middle section. I also trade some blocks on the right hand side of my quilt to spread out some more of the reds. 

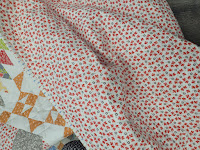
I used a cotton print from the Figs and Shirtings Collection by Fig Tree for the backing of my quilt, which is the same collection that I used for the front. I quilted it with loops, a simple pattern that is not distracting from the blocks at all. I bound it with a light print from the collection. 

I am planning to hang this one in my sewing space. 


Thank you all for sewing along with me this past year. I have loved seeing your blocks and can not wait to see your finished tops and quilts. 

This is going to be the last blog post for awhile. I have not yet decided if I will post again in the future, but for now I would like to focus on some other avenues at the shop. Thank you for taking the time to read all my posts, I appreciate it so much. 

Kayla

Monday, December 6, 2021

The Bonnie and Camille Quilt Bee: Month 11

 Hello again! I am posting Month 11 for our Bonnie and Camille Quilt Bee just a little early, but I thought if I posted it today than I could post the finishing next week. Because if you are anything like me, once you get those final blocks finished you are not going to want to put it away again, but rather jump right into assembling your blocks into a finished quilt top!

This month we have 3 blocks to make, each one of them different. We have the Starburst Block on page 124, the Summer Block on page 126 and the Sunshine Block on page 128.

Starburst Block. For this block I chose to use a color that I felt I had not used very much of yet. Maybe you want to take a look at all your blocks and see if there is a color that is a little under represented. The block itself goes together really nicely. When making the center of the block I pressed the blocks in each row to A and when assembling the rows pressed both the top and bottom to the center, this helped with nesting seams and getting a nice flat center. When making the CG units I pressed my Left Units towards the G and my Right Units toward the C, this allowed me to nest the seams when assembling them and I got nice points there. 


Summer Block. For this block I had a mistake in my pattern book in the cutting instructions. For B in the background it says to cut a 2 1/2" strip and subcut into 4 - 4 1/2" squares. You need to cut your strip 4 1/2" in order to get the squares, 2 1/2" just won't work. To make the 4 hourglass units I did not cut my A, D and E squares into triangles instead I made half square triangles and than used those to make the quarter square triangles.

 To do this: (A is white, D is green and E is blue in my photos)

 Draw a line on the diagonal of the wrong side of a D square, place right sides together with a A square and sew a 1/4" from each side of the line, cut apart on the drawn line and press towards D. This will result in 2 AD HST units. 

Repeat with the remaining D and 1 E squares for 2 ED HSTs. 

Draw a diagonal line on the wrong side of a AD HST going across your stitch line. 

Place right sides together with a ED HST making sure your D pieces are not on top of each other and your seams are nested tight together. Sew a 1/4" from each side of the line. Cut apart on drawn line and press open. 

Repeat with the 2nd units to make a total of 4 ADED quarter square triangle units, also known as hourglass units. Trim to the correct size using your favorite method. I used my 4-in-1 Creative Grids Half Square Triangle Ruler. 

This is how I almost always make mine, and it avoids working with the bias edges too much.

The rest of the block I assembled as the pattern instructed. 


Sunshine Block. For this block I used my Ultimate Flying Geese Ruler from Creative Grids and the heart method to make 4 at a time flying geese. The cutting for this is a little different as you cut one large square and 4 small squares to make 4 Flying Geese, but I love the extra trimming room it provides. The sizes to cut are written on the ruler and how to trim are included in the pamphlet provided with the ruler. Once I had my Geese made I pressed completely opposite of the pattern, because I dislike pressing geese towards the top point but would much rather press towards the flat bottom of the geese. 
Aside from all my changes it was a fun block to make. 

I will be back next week to share some assembly tips!


Have fun making your blocks and have a great week. 
Kayla


Thursday, December 2, 2021

Garden Sampler BOM Month 12 and Finishing


It is December already! This year has flown by! 
With the start of a new month, it is time to pull the Block of the Month projects out. This month we have the last block of our Garden Sampler as well as finishing. The sashing in this quilt is quite intensive, and I, through the midst of vacations, working, and renovations was only able to get one section of sashing done and one cornerstone block finished to show you how I would do it. You'll have to watch our Facebook and Instagram page in the new year for my finished project, and if you haven't sewn along get your hands on a BOM Kit for it.

Now lets jump in to Block 12!
Below are my cut pieces, labeled with my alphabitties to keep them straight. 
I cut all my pieces according to the pattern this time.

Unfortunately I forgot to take pictures while I made the block 😔
I guess I really got into the zone.

For all the flip-and-stitch corners I used my Diagonal seam tape, which I will demonstrate below in the sashing components. 

The Components

The center of this block is constructed in a simple 9-patch fashion. 


After that I simply put the outer edges on my block and it is complete!
And how cute is it?

Block 12

Once that is done it is time to start on the sashing.

The cutting for the sashing looks quite daunting, my stripology ruler was a real time saver here. 
The ruler has slits at every 1/2" that you can put your cutter into. There is also a mark on each 1.5" cut and each 2.5" cut, which are the most common cuts needed, and it takes the math out of the process.

The pieces for the sashing
I labelled my piece with alphabitties and wonder clips. For the small pieces that I needed to cut approximately 240 pieces of I used a ziploc bag and wonder clipped the letter to the top of the bag.

First we have to make the frame around all the blocks, I cut these at 2" instead of the 1.5" so that I could be sure that I could square my blocks up to 12.5"

I then took my 12.5" square ruler, found the center of my square and the ruler, and trimmed all 4 sides.


After the sashing frame we need to do a navy frame. On one of the edges there is a flip-and-stitch corner. I used my diagonal seam tape for this.

Once you have the navy frame on play around with the layout for a while until you are happy with it. It does not need to be exactly in the same order as the pattern, but what makes you happy and love it.

This is the layout I settled with.

Next we need to make our cornerstone flowers. Each Flower is 4 squares with all 4 corners
 flip-and-stitched, one with a navy, and three with a background. Again I used my Diagonal Seam Tape.


Trim 1/4" away from all the seams and press. 
Then sew into a 4-patch with all the navy pieces in the center.

How cute is this cornerstone flower?1? I just love it!!!


Next is the sashing section, the green rectangles all have 3 flip-and-stitch corners. Once these leaves are made join two together, with a square in between. Make sure that the side with 2 flip-and-stitches goes toward the square. Then attach a background too each side and you are done the section. 


That's as far as I was able to get this week. The outer border also is just flip-and-stitches. 

Watch the Facebook and Instagram page for my completed quilt. Thanks for following and sewing along with me this year. 

I hope everyone has a fantastic holiday season and a very Merry Christmas, surrounded with family and friends. I am excited to be travelling up north to see my husbands family for the holiday season.