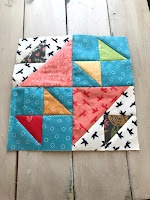
This week we are moving onto to section 2.
The section is listed as a whole on page 26 of your books. It contains 6 blocks, 2 of them being focal ones and the remaining 4 are fillers.
We are going to make:
1 -- Pershing Block on page 6
1 -- Old Maid Puzzle on page 17
1 -- Courthouse Steps on page 20
2 -- Square on Square on page 22
1 -- Bordered Square on Square on page 23
Pershing Block, from all the research I've done for this quilt along, this is said to be the "hardest" block in the quilt, so it is nice to get id done an set aside. It has a lot of bias edges which can make keeping it square a little tricky. I actually ended up using my 6" Square on Square ruler from Creative Grids for the first section of this block. It is a trim tool, and each section of the block is made oversized, than trimmed to the correct size, the result is very nice points in each square.
 If you would like to use the ruler cut the following
Fabric A: 1 square 2.5"
Fabric E: 2 squares 3" cut once on the diagonal
Fabric B: 2 squares 3.5" cut once on the diagonal
Fabric C: 2 Squares 4.5" cut once on the diagonal.
Cut the Fabric, D, F and the small E squares as listed in your pattern.
Follow the instructions on the ruler to add each section of triangles, starting with A2 as the center block, in the order listed in the book.
After adding the C triangles follow the pattern to finish the block.
Whether you follow the book or use the ruler be sure to set some time aside to focus just on this block and take your time to. I strongly suggest starching your fabrics before sewing, and be careful when pressing to not stretch and distort your blocks.
If it comes out smaller than it should you can always add a small border to make it the correct size.

 Old Maid Puzzle, a little less intense than Pershing and fabric choice is a lot of fun for this one. You can go as scrappy as you like or plan it a little if you like. I rounded the 7/8" measurements up to the next full inch for a little trimming room.
The 6 darkest triangles are the ones that are the 3 squares cut on the diagonal of 1 fabric. The other 6 are the white triangles and small medium grey.
I put my 6 leftover triangles in a bag marked with the size, as this happens to be a popular size throughout the pattern.
 Courthouse Steps, we need to make just 1 block, and it will be 7" finished (7.5" now before we get it into the quilt), all the cutting sizes are listed at the top of the second column on page 20. If you like fussy cutting, the center of this block is perfect for it.
Square on Square, we need to make two that both finish at 3", this is the same size as last weeks, so nothing new here.

Bordered Square on Square, we need to make 1 of these. It too goes together the same as last weeks, however we need to make it a little larger. We are going to make a 4" square on square following the directions on page 22, and than add borders to it following the instructions on page 23 to make a 6" finished block, which will measure 6.5" until it goes into the quilt.

That's it, after you have made these 6 blocks you can snap a quick photo, upload it to are Facebook Group and than you are ready to bag them and set aside until we assemble the quilt top. Onto section 3 in two weeks.
No comments:
Post a Comment