Good evening. Today I want to share with you a little tutorial on how to make our favorite oven mitt. It is a fairly quick project and makes a great gift, either by itself or paired with an apron or some baking items.
To make this oven mitt you need
1/4 meter outer fabric
1/4 meter lining fabric
1/4 meter insul-bright
Fat quarter or 0.4 meter binding fabric
The first step is to make a quilt sandwich with your outer fabric, lining and insul-bright. The-insul bright does not have a right or wrong side so it does not matter which way it lays between your fabrics. Quilt the pieces together how ever you like. Straight lines works really well, I put it on my longarm and did a fun geometric design for this tutorial.


Make an oval template. It should be 9" at its tallest point and 5" at its widest. We used Microsoft Word and made a an oval shape and put those dimensions to get it nice and rounded.
Use your template to cut two ovals from your quilt sandwich.


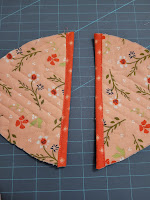
Next find the center of one oval and draw a line and measure out 3/4" from each side of that line and draw another line. Cut on the last two lines you drew. You are cutting out a 1.5" strip from the center of one oval to make your pockets.


Bind the straight edges of these two semi-circles.
Now align all the raw edges of your oval and your two halves. There will be a gap in the center. Baste them together so they don't slip when you are putting the binding on.


The final step is to bind your oven mitt. You will need to use a bias binding because of the rounded edges. You don't need much. I cut a 16" square in half on the diagonal, and than cut a 2.5" strip parallel to that cut from each triangle and had more than enough. I machine bound my oven mitt for durability.


Written Instructions for ease of printing
Supplies Needed:
1/4m
of 2 coordinating prints
1/4m
of Insul-Bright
1/2m
Binding
Coordinating
Thread
Instructions:
Make
a quilt sandwich with your two prints, sandwiching the Insul-Bright.
Quilt
as desired.
Trace
the template on the following page and cut (2) out of your sandwich.
From
one of the ovals cut a 1.5” strip out of the center.
Bind
the straight edges of the halves.
Put
the two halves on the full oval, lining up the curved edges.
Baste
in Place.
Bind using your preferred bias Binding method.
Repeat to make a full set.
Great work. Digitizing Company Lovel.
ReplyDelete