Showing posts with label tutorial. Show all posts

Monday, November 29, 2021

Oval Oven Mitt Tutorial

 Good evening. Today I want to share with you a little tutorial on how to make our favorite oven mitt. It is a fairly quick project and makes a great gift, either by itself or paired with an apron or some baking items. 

To make this oven mitt you need 

1/4 meter outer fabric

1/4 meter lining fabric

1/4 meter insul-bright

Fat quarter or 0.4 meter binding fabric

The first step is to make a quilt sandwich with your outer fabric, lining and insul-bright. The-insul bright does not have a right or wrong side so it does not matter which way it lays between your fabrics. Quilt the pieces together how ever you like. Straight lines works really well, I put it on my longarm and did a fun geometric design for this tutorial. 


Make an oval template. It should be 9" at its tallest point and 5" at its widest. We used Microsoft Word and made a an oval shape and put those dimensions to get it nice and rounded. 

Use your template to cut two ovals from your quilt sandwich. 


Next find the center of one oval and draw a line and measure out 3/4" from each side of that line and draw another line. Cut on the last two lines you drew. You are cutting out a 1.5" strip from the center of one oval to make your pockets. 


Bind the straight edges of these two semi-circles. 
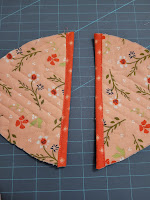

Now align all the raw edges of your oval and your two halves. There will be a gap in the center. Baste them together so they don't slip when you are putting the binding on. 


The final step is to bind your oven mitt. You will need to use a bias binding because of the rounded edges. You don't need much. I cut a 16" square in half on the diagonal, and than cut a 2.5" strip parallel to that cut from each triangle and had more than enough. I machine bound my oven mitt for durability.


I hope you enjoy making these oven mitts for yourself and as gifts for friends and family. I think I may need to pick up some Christmas Fabric and make some Aprons and Oven Mitts for Christmas gifts for a few special friends this week.
 
Kayla

I tried to upload the template here but the few methods I tried would not work. If you send me an email I can always send you an email of the template and written instructions. 

Written Instructions for ease of printing 

Supplies Needed:

1/4m of 2 coordinating prints

1/4m of Insul-Bright

1/2m Binding

Coordinating Thread


Instructions:

Make a quilt sandwich with your two prints, sandwiching the Insul-Bright.

Quilt as desired.

Trace the template on the following page and cut (2) out of your sandwich.

From one of the ovals cut a 1.5” strip out of the center.

Bind the straight edges of the halves.

Put the two halves on the full oval, lining up the curved edges.

Baste in Place.

Bind using your preferred bias Binding method.

Repeat to make a full set.


Monday, October 25, 2021

Lanyard Turtorial

 Happy Monday. 

Christmas is coming up quick and for many of us that means it is time to start getting some little gifts together for Teachers, coworkers, coaches and friends. 

Over the next little while I thought I would share with you some of my favorite gifts to make. 

One of my favorite gifts to make is a lanyard, They are quick and simple to make and take very little material wise. I thought for this one I would write up a little tutorial on how to make one. 

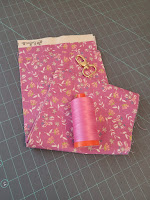
To make a lanyard you will need a swivel hook, a strip of fabric and coordinating thread. You will see the stitches on the top and bottom, so don't forget to change your bobbin thread as well. When making several different lanyards I choose a thread that matches them all so I don't have to load up so many bobbins. 

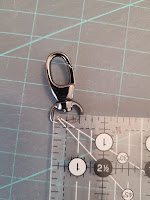
Swivel Hooks come in a variety of sizes and colors. I personally like the 3/4" size the best. 1" hooks work well too but are a little larger for wearing around your neck. I would not go bigger than 1". I also use the 1/2" size especially when making them to wear with  my masks (it works really well to clip the lanyard onto your mask when doing errands for the day, you never have to worry about dropping your mask or forgetting it in your car) 

When you have chosen your swivel hook size, you can than figure out how wide to cut your strip of fabric.  If you do not know what size of hook you have just measure the inside of the flat ring, in the photo below you can see the one I measured is a 1/2" swivel hook. 

Take the size of your swivel hook and multiply it by 4 and that is the width to cut your strip.

For example a 3/4" hook -- 0.75" x 4 = 3" or for a 1" hook -- 1"x 4= 4" strip. 

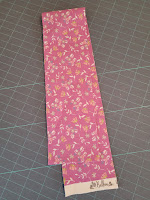
I use a full width of fabric and just cut the selvage edges off. For my kids I usually shorten the strip to about 30"

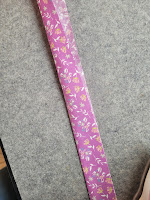
The next step is to press the strip in half with the wrong sides together. Match up the raw edges of the two long sides and press it. 

Open it up and fold the two raw edges to the center, they should meet at the crease you just made in the center. Again wrong sides together. 

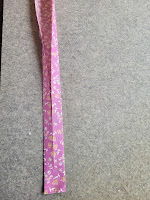
Fold it back in half again and press once more, the two long raw edges should be enclosed in the inside, and it should now be the same width as your swivel hook.

Slide your swivel hook on to your pressed strip of fabric and fold it in half so the two short ends meet. Double check there are no twists in the fabric. I like to use a couple clips to keep it together nice for the next step. 

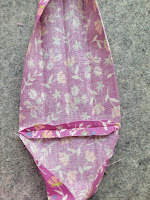
Unfold the fabric at the two ends and line up the edges. Stitch it together at 1/4" seam.

Clip the two corners with a little scissor and press your seam open. Clipping the corners help reduce a little bulk when we fold it back together in the next step. 

Fold it back together and give it a little press. You should now have one big loop with a swivel hook on it

Now we need to stitch down the two long edges. I like to loop the fabric around the throat of my machine. Sew down the edge of the fabric at 1/8" seam allowance. For me this is the inside of my sewing foot. Slide your swivel hook out of the way as needed. Repeat this for both long edges of your fabric. I like to lengthen my stitches a little for this and change my settings from a 2.5 stitch to a 3.0. 


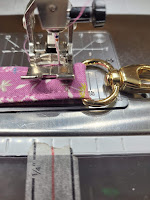
One final step to complete the lanyard. We want to secure the swivel hook in one place to keep it from sliding around. To do this position the swivel hook where you would like it (I usually put it very close to the seam that connects the two short ends of my fabric) and stitch across the fabric to secure it in place. I like to move my needle over to the right to get a little closer to the swivel hook. Sew over it back and forth a couple times so it is nice and secure. 


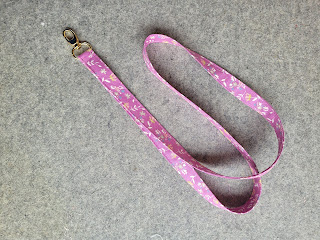
Ta da! you now have a completed lanyard! A great gift by itself or paired with some other small items.


Thank you for reading this little tutorial. 
Have a great week. Kayla


Thursday, April 16, 2020

Half Square Triangle: Making the units

Happy Thursday, and what beautiful weather today! I for one decided to let my boys skip out on the majority of schoolwork today and had them play outside instead. All of us loved the change, and the sunshine and fresh air felt so good! Were you able to get outside at all?
Esther and I also filmed the next section of the Half Square Triangle Series. We did it live on Facebook, and the video has been posted to our feed so it is still available to watch on our page, Chicken Feed Quilts.
Basically Esther went over how to construct the Half Square Triangle Unit and showed a couple layouts as well.
If you prefer learning by reading and pictures rather than video, here are some written instructions.
The first step is to draw 2 diagonal lines on the wrong side of your background square. 
Next stack a print and a background square right sides together ans sew a 1/4" on each side of both lines, so you should have 4 stitch lines total that run across the diagonal. I sewed these ones in red so you can see the stitching.


After the lines are sewn you cut the square in half in both directions at the 5" mark, and cut on each diagonal as well.
Next step is to trim using the 4-in-1 Half Square Triangle Ruler from  Creative Grids. The markings on the ruler are for finished sizes, in this case we are making 4" finished blocks, so we will find the dashed line by the 4" marking and place that on top of our stitch line, than trim both sides.


Press the direction you prefer and you should have a really nice looking 4.5" unfinished Half Square Triangle Unit.
This method will give you a total of 8 half square triangle units from the two 10" squares (one print and one background)
If you happen to have Charm Squares instead of Layer Cakes you can draw 1 diagonal line and sew on both sides and cut only on the drawn line and this will give you the same 4" finished HST, you will get 2 from 2 5" squares (one print and one background)
Have fun making Half Square Triangles, next week we will do some layout work and see the many different ways these units can be laid out to make a wide variety of blocks.
Have a great weekend,
Kayla