Monday, October 25, 2021

Lanyard Turtorial

 Happy Monday. 

Christmas is coming up quick and for many of us that means it is time to start getting some little gifts together for Teachers, coworkers, coaches and friends. 

Over the next little while I thought I would share with you some of my favorite gifts to make. 

One of my favorite gifts to make is a lanyard, They are quick and simple to make and take very little material wise. I thought for this one I would write up a little tutorial on how to make one. 

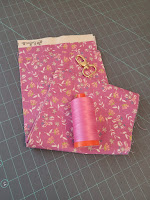
To make a lanyard you will need a swivel hook, a strip of fabric and coordinating thread. You will see the stitches on the top and bottom, so don't forget to change your bobbin thread as well. When making several different lanyards I choose a thread that matches them all so I don't have to load up so many bobbins. 

Swivel Hooks come in a variety of sizes and colors. I personally like the 3/4" size the best. 1" hooks work well too but are a little larger for wearing around your neck. I would not go bigger than 1". I also use the 1/2" size especially when making them to wear with  my masks (it works really well to clip the lanyard onto your mask when doing errands for the day, you never have to worry about dropping your mask or forgetting it in your car) 

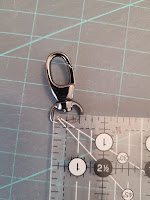
When you have chosen your swivel hook size, you can than figure out how wide to cut your strip of fabric.  If you do not know what size of hook you have just measure the inside of the flat ring, in the photo below you can see the one I measured is a 1/2" swivel hook. 

Take the size of your swivel hook and multiply it by 4 and that is the width to cut your strip.

For example a 3/4" hook -- 0.75" x 4 = 3" or for a 1" hook -- 1"x 4= 4" strip. 

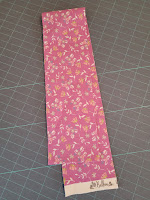
I use a full width of fabric and just cut the selvage edges off. For my kids I usually shorten the strip to about 30"

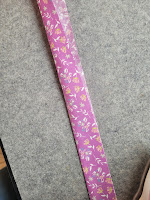
The next step is to press the strip in half with the wrong sides together. Match up the raw edges of the two long sides and press it. 

Open it up and fold the two raw edges to the center, they should meet at the crease you just made in the center. Again wrong sides together. 

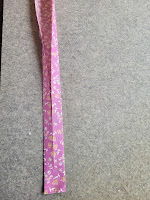
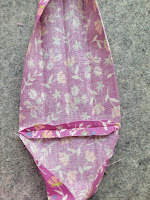
Fold it back in half again and press once more, the two long raw edges should be enclosed in the inside, and it should now be the same width as your swivel hook.

Slide your swivel hook on to your pressed strip of fabric and fold it in half so the two short ends meet. Double check there are no twists in the fabric. I like to use a couple clips to keep it together nice for the next step. 

Unfold the fabric at the two ends and line up the edges. Stitch it together at 1/4" seam.

Clip the two corners with a little scissor and press your seam open. Clipping the corners help reduce a little bulk when we fold it back together in the next step. 

Fold it back together and give it a little press. You should now have one big loop with a swivel hook on it

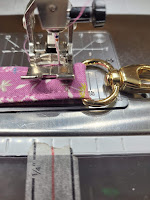
Now we need to stitch down the two long edges. I like to loop the fabric around the throat of my machine. Sew down the edge of the fabric at 1/8" seam allowance. For me this is the inside of my sewing foot. Slide your swivel hook out of the way as needed. Repeat this for both long edges of your fabric. I like to lengthen my stitches a little for this and change my settings from a 2.5 stitch to a 3.0. 


One final step to complete the lanyard. We want to secure the swivel hook in one place to keep it from sliding around. To do this position the swivel hook where you would like it (I usually put it very close to the seam that connects the two short ends of my fabric) and stitch across the fabric to secure it in place. I like to move my needle over to the right to get a little closer to the swivel hook. Sew over it back and forth a couple times so it is nice and secure. 


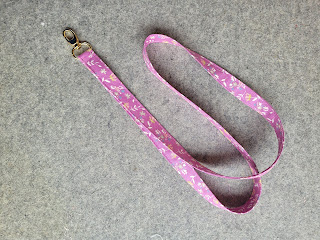
Ta da! you now have a completed lanyard! A great gift by itself or paired with some other small items.


Thank you for reading this little tutorial. 
Have a great week. Kayla

Monday, October 18, 2021

The Bonnie and Camille Quilt Bee: Month 9

 Happy Monday, I hope you all had a great Thanksgiving Weekend. Today we are moving on to Month 9 in our Bonnie and Camille Quilt Bee. You had an extra week to catch up so I hope you are ready to move on. 

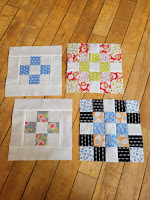
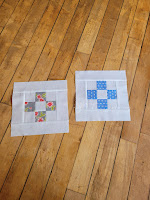
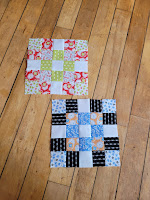
This month we need to make total of 4 blocks, but they go quick because it is actually only two different block patterns. The Nine Patch Block can be found on page 116 and the Plaid Block can be found on page 117.


Nine Patch Block. We need to make 2 of this block for our quilt. This one takes only a little bit of a print fabric, so I used a blue that I had very little left of but wanted in the quilt once more and a Black print that is one of my favorite in the bundle to get a little more of the black in the quilt but not be too overpowering. It goes together really well, but if you are unsure about getting it nice and square you can cut your borders for the block a smidge bigger and trim the block to the correct size after pressing. 

Plaid Block. Again we need to make 2 of this block for our quilt. I chose a main print for each of my two blocks and then chose some accenting prints afterwards. I love how different the two blocks look from each other with different fabric and the darker colors in different spots. This block goes together nice as well, just be careful to gently press those strip sets so you don't stretch your fabrics at all.

We only have 6 left blocks left to make once these are done, and I am really wanting to get mine finished. I got my backing and binding last week, do you have yours picked out yet or will you wait until the top is finished?

Kayla

Thursday, October 7, 2021

Garden Sampler BOM: Block 10

 It is the beginning of a new month, and time to pull out our block of the month projects again. 

I am glad to be back in my sewing room after the wedding, my honeymoon and then getting all settled in. My new husband nicely took me to my parents to pick up my sewing room just a few days after we made it back home. It was good to pull out just one block to get into it again, so this was perfect.

We are already on Block 10 of our sampler, which means we are so close to being done.

My Cut Pieces

I found this block nice and simple, just a few flip and stitches and the block is ready to be put together. 
I stitched all my corners onto the big blue square before cutting and pressing. Be sure to watch the placement of the colors and the angle you sew at to make sure they go the right way.


The Components

That is all for this block, it really is just a few flip and stitches and then piecing it together.


I just love how this block turned out. Probably because it is mostly blue, and I really like blue. 
I can't wait to get my quilt put together, we will see if I can wait until December to put it all together, or if I'm going to work ahead and get it finished or not. 

That's all for that block, but there are a few things that should get mentioned.
 This weekend we have our fall clearance sale, Thursday, Friday and Saturday. There is still room to join us, and pre-registration is recommended to skip the lines. Check under the events tab on our website to see if there is a time that works for you. 
There will also be a virtual option for our out of town guests, Wednesday Oct 13, check under the events tab to register for that as well.

We will be Closed Monday Oct 11 to spend Thanksgiving Day with our families.
Have a great long weekend everyone! 


Monday, October 4, 2021

New Fabric: October

 Happy Monday. I hope you all had a good weekend, here in Coaldale the weather was beautiful and our family spent a lot of time outside. It was also the first year in quite a few that we did not have snow the first weekend of October, so that was a nice bonus. 

Today I have a few new fabric lines to share with you. 

We have the new Moda Lakeside Toweling in stock. If you click here you will find a good list of ideas on what to use it for and what to make. We did put a kit together called Sea Salt and it goes together super quickly. 


Hustle and Bustle by Basic Grey is a new Christmas Collection. Carrie made the quilt in the photo using one of the patterns from Sew A Jelly Roll Day called Step This Way, we are putting kits together for this and they should be available soon. 

Many of you have been anxiously awaiting the arrival of the Art Gallery Flannel, and it arrived just before Carrie's wedding. It is just as soft as I imagined it would be! It will be fantastic for quilts, backing, and even Pajama pants or pillow cases. 

Cozy Up by Corey Yoder is also available now. It is selling rather quickly so if it is on your must have list I suggest you act quickly. We made a couple kits up for this line, one is sold out already but we still have kits for Roadside Harvest and Scrappy Happy Village.


And for all the glampers we have a new collection instore for you too. It is called Joy in the Journey. 

This week Thursday-Saturday is our Fall Clearance Sale in our Classroom, pre-registration is recommended, but walk-in shopping is available as well. Priority will be given to those that have pre-registered for their time slot. 

Next week Monday is Thanksgiving Day so the shop will be closed. Their will also be no blog that day, so if you are a little behind on your Bonnie and Camille Quilt Bee Blocks, you get an extra week to get caught up again. 
Have a great week and Happy Thanksgiving!

Kayla


Monday, September 27, 2021

Sewing for Fall

 Fall is here, and it is beautiful this year. The colors are gorgeous and the temperatures are wonderful. I love fall and I really love to decorate my house for the season as well. Today I thought I would share with you some fall projects to inspire you and I wonder do you decorate for the autumn season at all?

Last year I made this fun little runner and matching pillow. The pattern is called Pumpkins by Cluck Cluck Sew and I just made one block for the pillow and 5 for the runner. I used fabric from Summer Sweet by Sherri and Chelsi and from Abby Rose by Robin Pickens. 

Esther used the same pattern as I did and made the lap size quilt using Pumpkins and Blossoms by Fig Tree. I love how it turned out and I think it would be so cute draped over a couch or on a blanket ladder. We have Kits in the shop for this one, just click here. 

Last year Esther made this really fun quilt called Vintage Fall by Confessions of a Homeschooler. She used a variety of Corey Yoder prints, but her new collection Cozy Up would be fantastic for it as well. 

Cider by Basic Grey is a fantastic collection for fall without bringing any pumpkins into the mix. Esther is working on a really fun Jelly Roll Quilt from the book On a Roll Again with it right now and we are planning to put kits together for it as well. This is a photo from the book as Esther's was not available for me to get a photo of today. But hers is the same as this. 


Just today my Husband said I needed to make some small seasonal quilts for our porch, and so I will be browsing for some mini quilt ideas myself, because when your husband tells you to make a new quilt you definitely jump on that one quick. 

Have a great week!
Kayla


Tuesday, September 21, 2021

Shop Updates

Due to the lastest set of restrictions that have been put in place there are a few things that have changed for our shop. 

Limited Capacity

As a retail shop we are allowed to remain open to the public for instore shopping. 
However we are once again asked to limit the number of customers in our shop at one to time to 1/3 of fire code. 
We have chosen to go a little lower than 1/3 just as we have in the past to allow for sufficient room to social distance. 

We would like a maximum of 8 customers in the shop at one time. If it looks busy inside please just ask one of the girls if it is ok to come in or if you need to wait until others leave. 

 Masks are mandatory for all shoppers. 

Curbside pick up is available for those unable to come in the shop or for those who feel uncomfortable doing so. 

Harvest Tea

At this time we have decided to postpone the Harvest Tea indefinitely. 
This includes the presentations by William and Rob as well as the Demo, Do, Donate portion of the event. 
We don't want to say cancelled as we would really love to have the event, but at this time it is just not a possibility for a variety of reasons.
For those that have signed up for the presentations we will be contacting each one of you individually. 

Classes

We have no in-person classes planned at this time. 
We do have a Skill Builder Series planned to start next month. This series will be done on our Facebook Page with each session being its own little video. The videos will be done live so you can ask questions, and will be posted on to our page so you can refer back to them later. 


There is new products and fabrics arriving in the shop every week
so check out our website or stop in to see us

Shop hours
Monday - Friday: 10am - 5pm
Saturday: 10am - 2pm 
Sunday: Closed

Monday, September 13, 2021

The Bonnie and Camille Quilt Bee: Month 8

 Welcome to another Month in our Bonnie and Camille Quilt Bee. We have reached Month 8 and we need to make a total of 3 blocks this time. They go together pretty quickly, I did all 3 of mine in a couple hours this past Saturday morning. 

We need to make the Home Again Block on page 110, the Lighthearted Block on page 112 and the Neighborhood Block on page 114. 


Home Again. I love house blocks so I was thrilled that there was one in this quilt. I have a couple tips for you for this block. 

First if using directional fabric for the windows, be sure to pay attention when cutting so that they all go the same way when in the block. O and Q should both be the same height when cutting, and the widths will be different. 

When I have a lot of piecing in a section and have to add borders at the end I like to wait to cut those until I have the center done, than I can adjust the borders if needed. In this block you may want to cut your "B" pieces a little wider than mentioned, and than after you sew them onto the center section, trim the block to the correct size than add the roof part. This will ensure you don't need to stretch anything. 

When making the shrubs pay careful attention to what edges you place the little squares and double check before adding the next fabrics that you have them oriented the right way. Otherwise you may end up with some upside down bushes outside your home. 

I actually ended up making this block twice. I chose some fairly muted colors for some of my sections the first time and was not happy with the way it turned out, so I went much brighter the second time. 

First attempt, that I didn't even finish all the way, a little dull compared to the other blocks I have been making


Lighthearted Block. Heart Blocks are another of my favorites to make, so this was a fun month for me. And this heart was really quick to make. 

6 different prints are needed, and I was able to make that work with my Red Fabric so that is the color I chose. One of my pieces was actually a few inches shorter than it was supposed to be, but because of how the block was constructed I was able to make it work anyways. I just used it as my bottom strip and centered it with the fabric above it. 


Neighborhood Block.
For this block be sure to pay attention to the first step when sewing. You need to sew on the drawn line to make the HST. This is different than how we have done the others in this pattern. 

Other than that it's just a bunch of Flip and Stitch Corners and some assembly of the units to make the block. I suggest laying out all the units before sewing them together so that you get the colors arranged how you want them. I also do not like pressing seams open so I will post a picture of how I pressed my seams so they all nest. It is just personal preference, and I use a really hot iron and don't like burning my fingertips. 


That is it for this month. Here are all my blocks so far!


Have you made any of the other quilts in this book yet? Two of the blocks we need to make this month are used for other patterns in the book too. The Lighthearted Block is repeated several times to make the You Have My Heart Quilt on page 8. And the Neighborhood Block is used together with the Criss Cross Block from Month 3 to make the Legacy Quilt on page 12.

Kayla